CockroachDB & Deno: Combining 2 "Quick to Start" Technologies
By Morgan Winslow at
Create a simple application with Deno & CockroachDB Serverless

Difficulty: Beginner - assumes no prior experience with CockroachDB or Deno
Completion Time: 30 mins (full code for tutorial can be found at the bottom)
This tutorial will walk through building a simple application using Deno, backed by CockroachDB (CRDB) Serverless. Deno (pronounced dee-no) is a "modern runtime environment for Javascript and Typescript", while CockroachDB Serverless offers free startup that scales with your app. Both technologies claim quick startup times for developers so I'd like to test them out together and see how quickly we can get a full end to end application running.
Deno Overview
While I'm familiar with CockroachDB, I'm new to Deno. Below are a few of the features that Deno is known for that caught my attention.
No npm (package manager). Deno loads modules via URLs and then caches them to avoid reloading every time. This is quite a different approach from package.json and node_modules that many developers are accustomed to
Security as a focal point. Deno has no runtime access to the file system, network, env variables, among other things. If we try to run a program that accesses any of these features and don't specify the appropriate flag, Deno will request permission in the console to perform the action. I'll show an example of this as we get started
Typescript built in
For this exercise we'll be looking more at the quick start time and developer friendliness of Deno, rather than some of the security features it boasts.
CockroachDB Overview
CockroachDB is a distributed SQL database that promises the ability to "Scale fast. Survive anything. Thrive anywhere." A CRDB cluster runs on multiple nodes but maintains a single logical database. The architectural decisions made when designing CRDB allow for regional to global scale, all while maintaining ACID compliance. Cockroach also supports PostgreSQL wire protocol and the majority of PostgreSQL syntax which means we can start issuing commands out of the box.
For this exercise we'll be utilizing the quick startup times of the Serverless offering, rather than exploring some of the survivability characteristics of CRDB.
Install & Setup Deno
Step 1 - Install
Deno offers several different install methods, but I went the Homebrew route.
brew install deno
Step 2 - Dev Env (optional)
Setup a dev environment. I already had Visual Studio Code installed so I went ahead and added the extension.

Step 3 - Create Web Server
We are going to skip the traditional "Hello World!", and jump straight to getting an HTTP server running locally. Create a new Typescript file called hello.ts and add the following snippet taken from the Deno site.
import { serve } from "https://deno.land/std@0.140.0/http/server.ts";
const port = 8080;
const handler = (request: Request): Response => {
  const body = `Your user-agent is:\n\n${
    request.headers.get("user-agent") ?? "Unknown"
  }`;
  return new Response(body, { status: 200 });
};
console.log(`HTTP webserver running. Access it at: http://localhost:8080/`);
await serve(handler, { port });
There's a few things I'd like to point out here:
Take note of the import straight from a URL. As mentioned previously, Deno will load the module rather than use a package manager. If you used the Visual Studio Code extension, you should have even seen a callout saying that the dependency has not been downloaded and that it can cache it for you. If you don't cache, Deno will download at runtime
Try running this program with the following command
deno run hello.ts
You should see Deno's security features spring into action and request permission to use net access.
After allowing permission, you should be able to navigate to localhost:8080 and see some info about the agent. To avoid having to give permission every time, run your program with the added flag
deno run --allow-net hello.ts
Congratulations, Deno is installed and already running a server! Overall, this setup speed was exactly what I was looking for. The install and setup was easy and should only take 5–10 mins from download to web server. Next steps are to connect to a database, but first let's set it up…
Setup a CockroachDB Cluster (Serverless)
Although CockroachDB has a few different deployment options, I chose to go with Serverless (Beta) for it's quick start up time. It also has automatic scaling if I choose to play around with this more. And it doesn't hurt that it's free to start :)
Step 1 - Create Account
After navigating to the link above, choose to "Start Instantly" with Serverless. Create an account or sign up with one of the SSO options like Google or GitHub.
Step 2 - Configure the Cluster
You will be brought to a page with configurations pre-populated (screenshot below). The cluster is pre-configured to get you going immediately, but feel free to set some of these options yourself as it won't have any impact on our project. Notice the 'Spend limit' is automatically set to $0 and we do NOT have to enter any credit card info to begin.
Go ahead and click "Create your free cluster" after you've set your configurations. I updated my cluster name from swift-jumper to crdb-deno but left the rest the same. The cluster is created in seconds and prompts you to Create a SQL user.
Step 3 - Create SQL User
Generate a password, copy it, and save somewhere safe as we will need it to connect later.
Step 4 - Connect to your Cluster
After password generation, Cockroach will present you with a few different options for connecting to the cluster. This is up to the user's personal preference, but I used the "CockroachDB Client" option. Download the client and then copy/paste the command to connect and start issuing commands. Feel free to use a GUI client and choose the "Parameters" if that is more comfortable.
Step 5 - Create a Table
Now that you are connected, you are able to run SQL commands as normal. You'll notice that some databases are already created for us. Feel free to create your own, but this exercise will just the utilize defaultdb we get out of the box.
show databases;
Next, let's create very simple dinosaurs table, that will contain their name, diet, and a link to read more.
CREATE TABLE dinosaurs (
    name VARCHAR(50),
    diet VARCHAR(20),
    link TEXT
);
Step 6 - Insert Data
To populate the database I utilized the data found in this github project by saving it as .csv and deleting all columns besides the ones listed in the CREATE statement above.
Importing that data into CockroachDB took a little digging. Ultimately I used a command called cockroach userfile upload that allows you to upload a file to the storage space in your cluster. From there you are able to issue an IMPORT INTO command that will copy over the data. If you prefer to skip these steps, skip below to where you can copy a simple insert of one row of data to test.
6.a (Optional) - Import .csv file using CockroachDB Client From your terminal, issue the below command that will upload your local .csv file to the storage space on your cluster. Make sure to specify the correct source path and that you've followed the instructions for downloading your cert.
cockroach userfile upload /YOUR/SOURCE/PATH/dinosaurs.csv /dinosaurs.csv --url "postgresql://morgan@free-tier14.aws-us-east-1.cockroachlabs.cloud:26257/defaultdb?sslmode=verify-full&options=--cluster%3Dcrdb-deno-2179"Take note of the file location that is returned from the command. It should look similar to this:
userfile://defaultdb.public.userfiles_morgan/dinosaurs.csv
Return to the SQL client and issue the Import command, making sure you use the file path noted above.
IMPORT INTO dinosaurs (name, diet, link)
CSV DATA('userfile://defaultdb.public.userfiles_morgan/dinosaurs.csv');
The data should now be imported into your table. If you chose to add your credit card to your Serverless instance, then you can import from sources such as Amazon S3, Azure, or Google Cloud Storage. This would allow you to bypass the upload process via CockroachDB Client. You can read more about this here.
6.b (Insert 1 row) - copy/paste code below
INSERT INTO dinosaurs (name, diet, link)
VALUES ('triceratops',
        'herbivorous',
        'https://www.nhm.ac.uk/discover/dino-directory/triceratops.html'
        );
And that's it! Overall, the CockroachDB Serverless setup is extremely quick. Connecting to the database may take a bit longer if you don't already have the client installed. The big hiccup for me was importing data. If you are creating tables and inserting data from scratch then liftoff time would be much quicker.
Connecting Deno to CockroachDB
To connect to CockroachDB we will be using Deno Postgres, a lightweight PostgreSQL driver. I encourage you to read the above link for some additional context around the following steps.
Step 1 - Add the new import
Continuing to work in your hello.ts file, add a new import for postgres.
import { Client } from "https://deno.land/x/postgres@v0.15.0/mod.ts";
Step 2 - Get and set the connection string
The site offers a couple different connection methods, but we will be utilizing a connection string as we can just copy/paste from CockroachDB. You can find the 'General connection string' in CRDB by clicking the 'Connect' button. You should see the following.
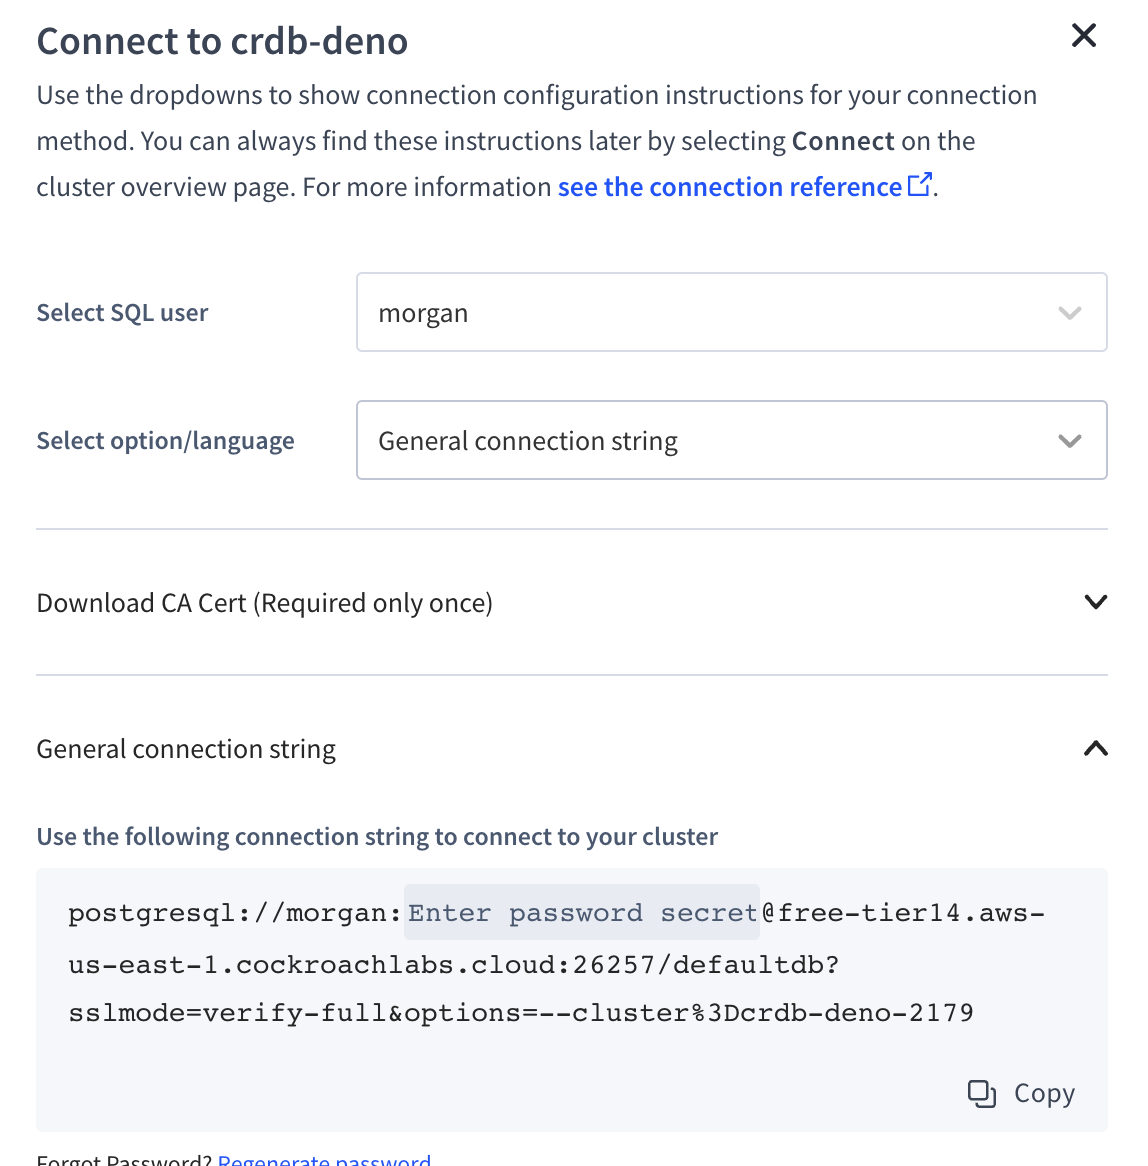
Note: Don't miss the several callouts by CRDB to download your CA Cert! Just copy/paste the command before moving forward with the general connection string.
Create a constant in hello.ts for your connection string and add your password. The connection string should specify all items necessary to connect to your database.
const config = "postgresql://morgan:ENTER PASSWORD SECRET@free-tier14.aws-us-east-1.cockroachlabs.cloud:26257/defaultdb?sslmode=verify-full&options=--cluster%3Dcrdb-deno-2179""Gotcha"
I'll go ahead and call out now that the connection string above will not work…at least not for me. There are a couple modifications I'll point out in case you hit the same.
Invalid sslmode
Uncaught ConnectionParamsError: Supplied DSN has invalid sslmode 'verify-full'. Only 'disable', 'require', and 'prefer' are supportedTo fix this problem, I updated my connection string to
sslmode=requireMissing cluster identifier
error: Uncaught (in promise) PostgresError: codeParamsRoutingFailed: missing cluster identifier
You'll notice that when we call out the database in our connection string, we do not specify a cluster. Let's add in the name of our cluster when calling out the database.
"...cockroachlabs.cloud:26257/defaultdb..."
becomes
"...cockroachlabs.cloud:26257/crdb-deno.defaultdb..."
These are the only 2 workarounds I came across in this exercise.
Step 3 - Create the client, connect, and query
Add the following lines which will pass your connection string to a client and create a connection. After connection, we will query for the 3 columns in our dinosaurs table and print the results. The result will be returned in an array of objects.
const client = new Client(config);
await client.connect();

const result = await client.queryObject("SELECT name, diet, link FROM dinosaurs");
console.log(result.rows); // [{name: 'triceratops', diet: 'herbivore', link: 'https://www.nhm.ac.uk/discover/dino-directory/triceratops.html'}, {...},]
Go ahead and run the program using the command as we did before.
deno run --allow-net hello.ts
You'll notice we hit another case of security measures from Deno since we are now trying to connect to a database.
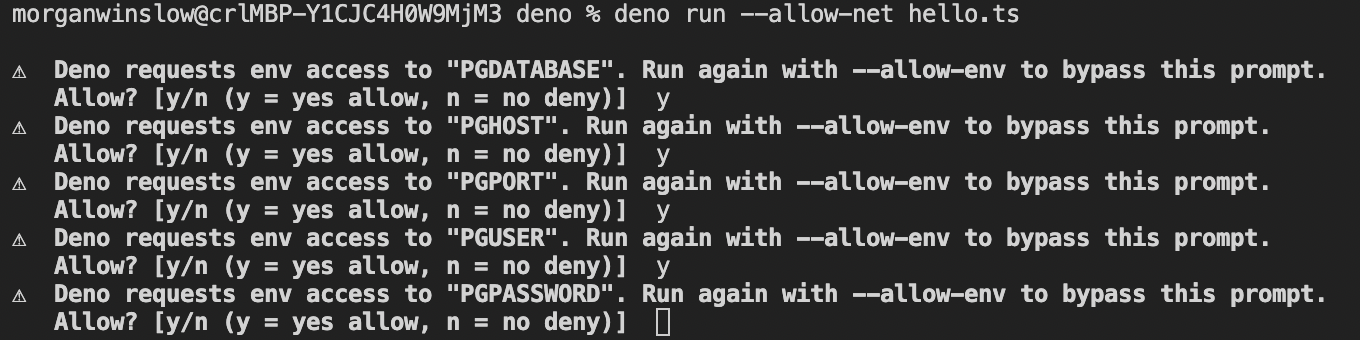
Let's adjust our command to the following to allow for access to the env variables created
deno run --allow-net --allow-env hello.ts
You should now see all results from the database printed in the console, and a running a web server.
Step 4 - Improvements
Now that we have everything connected, let's make a couple adjustments and display some of this data in the browser. The coolest feature to me is utilizing the full power of queryObject. We are using Typescript, so let's take advantage.
Create an interface called Dinosaur, that will represent our expected SQL return object. It will just be a 1:1 mapping of the columns in our dinosaur table.
interface Dinosaur {
    name: string;
    diet: string;
    link: string;
}
Now that we have this defined, we can specify it in our query.
const result = await client.queryObject<Dinosaur>("SELECT name, diet, link from dinosaurs");Instead of printing result.row, let's set it to a const called dinosaurs.
const dinosaurs = result.rows;
The const dinosaurs is now an array of Dinosaurs! Whereas before we were dealing with a type of unknown. This lets us leverage more powerful tools of Typescript. But for now let's keep it simple and return the first dinosaur's info to the browser.
Update your response handler to the following.
const handler = (): Response => {
  // Get first dino from the query results
  const firstDino = dinosaurs[0];

  // String concat the fields(columns) to be human readable
  const body = firstDino.name + ": " + firstDino.diet + ", " + firstDino.link;
  return new Response(body, { status: 200 });
};
Since dinosaurs is an array of objects, we can just grab the first one and specifically grab the table columns we are interested in. Here we are combing the first dinosaurs name, diet, and link to be human readable format.
Run the program and navigate to http://localhost:8080/ to see the results. If you imported the data set, you should see the following (unless you only inserted the Triceratops info).
aardonyx: herbivorous, https://www.nhm.ac.uk/discover/dino-directory/aardonyx.htmlConclusion & Next Steps
Congratulations! We not only linked Deno and CockroachDB, but we were able to quickly serve our data to the browser. Both technologies lived up to my expectations of quick starts, and connecting the two was very straight forward.
This simple program leaves a lot of room to grow and play around with both Deno and CockroachDB.
- - Get and display all dinosaurs. Use JSX to format the data
- - Add HTTP handlers for GET and POST endpoints. Insert new dinosaurs into the database.
- - Investigate the distributed nature of Deno Deploy and how that interacts with the distribution of CockroachDB, specifically if using multiple regions.
Full Code for Tutorial: hello.ts
import { serve } from "https://deno.land/std@0.140.0/http/server.ts";
import { Client } from "https://deno.land/x/postgres@v0.15.0/mod.ts";
// Connection string from CockroachDB. Insert your password
const config = "postgresql://morgan:ENTER_YOUR_PASSWORD@free-tier14.aws-us-east-1.cockroachlabs.cloud:26257/galaxy-hare-2055.defaultdb?sslmode=require&options=--cluster%3Dgalaxy-hare-2055";
// Connect to client via connection string
const client = new Client(config);
await client.connect();
// 1:1 mapping of column to field
interface Dinosaur {
    name: string;
    diet: string;
    link: string;
}
// Query the dinosaurs table and set to Dinosaur type
const result = await client.queryObject<Dinosaur>("SELECT name, diet, link from dinosaurs");
// result.rows is an array of Dinosaurs
const dinosaurs = result.rows;
const handler = (): Response => {
    // Get first dino from the query results
    const firstDino = dinosaurs[0];

    // String concat the fields(columns) to be human readable
    const body = firstDino.name + ": " + firstDino.diet + ", " + firstDino.link;

    return new Response(body, { status: 200 });
  };
console.log(`HTTP webserver running. Access it at: http://localhost:8080/`);
const port = 8080;
await serve(handler, { port });
// Run program using below command
// deno run --allow-net --allow-env hello.ts