Klotho and CockroachDB
By Morgan Winslow at
Quickly transform your local app to cloud-native with Klotho and CockroachDB
![]()
Overview
We'll be deploying a cloud native app with Klotho and CockroachDB. The tutorial will utilize a Typescript and Sequelize app example provided from Klotho. The goal is to end up with a fully cloud native app that is able to persist to CockroachDB, all without having to think about our cloud infrastructure. If that makes no sense...read the Klotho Overview below. (FYI Klotho is currently in Beta)
High Level Steps
- Install Klotho
- Clone the ts-sequelize example from Klotho
- Edit app to work with CockroachDB
- Compile to generate cloud native version of app
- Set up pre-reqs (AWS, Docker, Pulumi, CockroachDB)
- Deploy to the cloud
Klotho Overview
TLDR; Add Klotho annotations inline with your code in order to generate IaC that will deploy your application to the cloud 🚀
Today I'll be investigating a new platform called Klotho.
Klotho is a platform for making code cloud aware. It expands native programming language constructs with building blocks that capture the developer intent when targeting cloud and distributed systems.
So what does this mean? Let's say you have an application with a REST API that you've been testing locally and want to deploy it to the cloud...what are your next steps? I'm most comfortable with AWS, so I'd probably head there and follow some sort of guide to help me along. I've never claimed to be a cloud architect, so this is not always in my comfort zone.
Or maybe you're comfortable with Terraform or Pulumi and could utilize these tools as your next steps in deployment. No matter how you slice it, you're going to be needing time and resources to take your app to the cloud. Instances, Roles, Buckets, Routes, Permissions, Lambdas...the list goes on. I personally don't have fun deploying this infrastructure as I'd rather spend time developing.
Klotho looks to solve this problem by integrating inline with your current language and ecosystem. It accomplishes this via 'klotho annotations'. Going back to the REST API example, let's say you have information you need to be persisted and you need to expose your API. You could add the following to your code...
'Persist' Annotation
/* @klotho::persist {
 *   id = "petsByOwner"
 * }
 */
const petsByOwner = new Map();

async function addPetName(req, res) {
    ...
}

async function getAllPets(req, res) {
    ...
}
'Expose' Annotation
app.get('/pets', getAllPets);
app.post('/pets', addPetName);

/* @klotho::expose {
 *  id = "pet-api"
 *  target = "public"
 * }
 */
app.listen(3000, () => console.log('App listening locally on :3000'));
With just these two annotations, Klotho will "generate Infrastructure as Code (IaC) targeting AWS to deploy an API Gateway that invokes a Lambda function serving the application, using DynamoDB for persistence". To read more about the REST API example, look here.
Additional Links:
Install Klotho
Alright, let's jump in and install Klotho.
curl -fsSL "http://srv.klo.dev/update/latest/darwin/$(uname -m)" -o klotho
chmod +x klotho
Get and Examine the Code
There's a number of sample apps to follow, but we'll be working off of the Typescript & Sequelize example. You can find the code here. Let's take a look at index.ts and model.ts.
index.ts
Our main file contains a simple express app that allows us to post an item (key/value), and retrieve that item by key. In this file we'll find two Klotho annotations: execution_unit and expose.
Execution unit is the smallest deployable grouping of code. The annotations can be used to differentiate between separable units. The annotation does not necessarily guarantee the code will end up in separate units, it just defines the capability to be split.
The default for an execution unit will be Lambda, but Fargate is also an option.
We saw the expose annotation in the REST API example, but this will simply expose our API to the public. Klotho will create an API Gateway with this annotation. You can read more about the expose annotation here.
model.ts
This file contains our Sequelize logic that defines a key/value model that matches up with our API call. This will end up storing key/value information in CockroachDB.
Once again you'll notice the execution unit annotation at the top of the file. In addition we have our persist annotation.
/** @klotho::persist  {
*   id = "sequelizeDB"
* }
* */
const sequelize = new Sequelize(`sqlite::memory:`, { logging: false });
You'll notice that the persist annotation is exactly the same as it was in the REST API (id just defines resource name), even though the types are different. I thought this part was pretty cool...
In the REST example, the annotation was defined as a Map() which Klotho then uses DynamoDB as the backing store. In our case, since we have the annotation on a Sequelize type, Klotho by default will utilize RDS for the database. We'll update this to CockroachDB in just a moment.
You can read about other persist options supported by Klotho here.
Override DB Type
As mentioned above, the default DB type when using Sequelize is RDS. Let's update this to CockroachDB Serverless. When compiling our project (we aren't there yet), Klotho will generate a klotho.yaml file with generated configurations. We can create our own to override defaults.
Create a file called klotho.yaml in your main project with the following contents:
persisted:
    sequelizeDB:
        type: cockroachdb_serverless
You can read more about Klotho configuration files here.
Compile Application
There are commands to run the app locally, but I skipped straight to compiling.
This command is slightly different than the one found in the guide, since we need to specify our config.
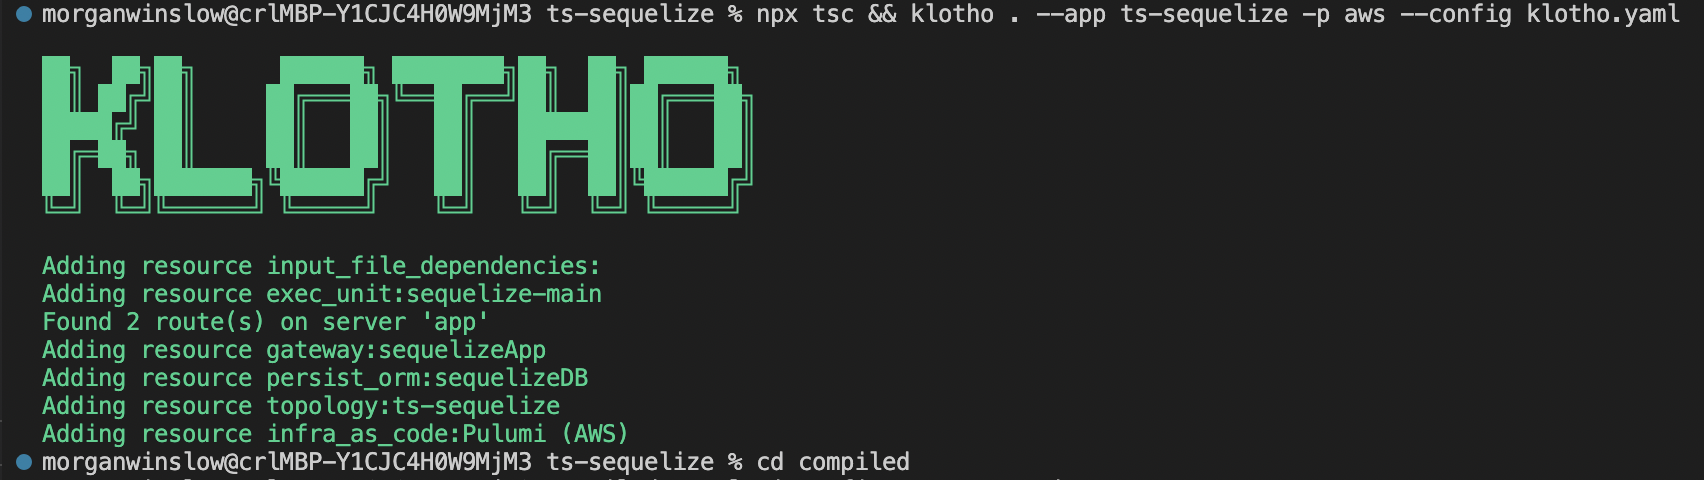
# Compile the app
npx tsc && klotho . --app ts-sequelize -p aws --config klotho.yaml
The resulting compiled directory will contain everything you need to deploy, run, and operate your application. You should see output like below.
Pre-reqs to Deployment
Before we get into the deployment, we need to make sure we have all the pre-reqs in place.
Dependencies
Deployment dependencies are outlined more clearly here, but I'll quickly list them below as well.
- Docker running
- An AWS account, with
AWS_ACCESS_KEY_IDandAWS_SECRET_ACCESS_KEYset as environment variables - Pulumi CLI
ccloudtool installed & logged in to your account viaccloud auth login.
Klotho has made it so that a cluster does not need to be created in CockroachDB before deployment. That being said, you must still have an organization setup and be authenticated to the ccloud CLI tool before deploying.
Pulumi Configs
Once dependencies are setup, cd into your newly created compiled directory. From here we will set some configs for Pulumi, which will ultimately create our cloud infrastructure.
AWS Region
pulumi config set aws:region YOUR_AWS_REGION -s ts-sequelizeIf this is your first time deploying, you'll be prompted to create an app stack. You can just hit ENTER here and the Pulumi stack will be created.
DB Username/Password
Next let's set the username and password that will be used by sequelize and ultimately for our CockroachDB database.
pulumi config set ts-sequelize:sequelizeDB_username <USERNAME> -s ts-sequelize
pulumi config set --secret ts-sequelize:sequelizeDB_password <PASSWORD> -s ts-sequelize
npm install
Finally, run npm install from your compiled directory. This should be your final pre-req to deploying the application.
Deployment
Now we can get to the exciting part! Here we will run a pulumi up command, preview our resources created, and then create.
pulumi up
pulumi up -s ts-sequelizeThis command will spit out a preview of all resources to be created. It should look similar to below.
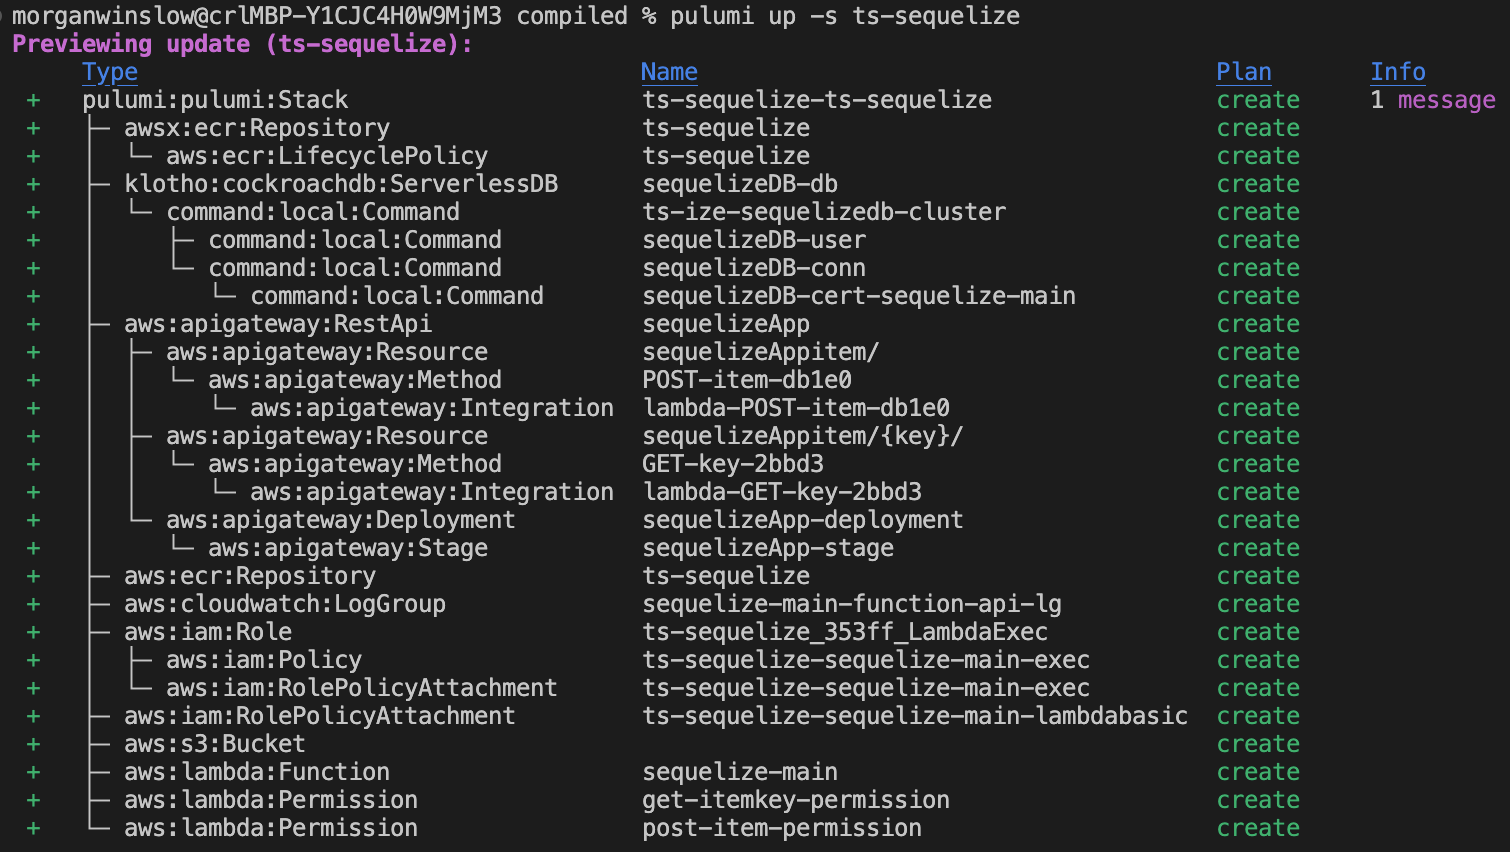
This is another pretty cool piece where you can see all the work that Klotho has done behind the scenes. We have 27 resources that are planned to be created, off just 4 Klotho annotations in our code.
You'll see a prompt asking if you want to perform the update. Use the arrow to select 'yes'. This will take a few minutes to run as your resources are getting deployed.
Output
Once completed, Klotho will display the following output.

The main thing we care about here is the apiURL, which exposes our API endpoints.
Note: You may notice under 'Diagnostics' that there has been an update to our cluster name. This is in reference to the CockroachDB cluster name. CockroachDB has since updated it's name length to 40, so this note should be going away soon enough.
Testing Deployment
Your cloud application should now be fully deployed! Let's double check the resources created, and then use the apiURL to test our new cloud application.
Cockroach Cloud
Because I'm a Cockroach guy first and foremost, I was excited to go an check my organization to see if I had a new Serverless cluster created. You can see the ts-ize-sequelizedb cluster was created successfully! You'll also notice my pre-existing cluster.

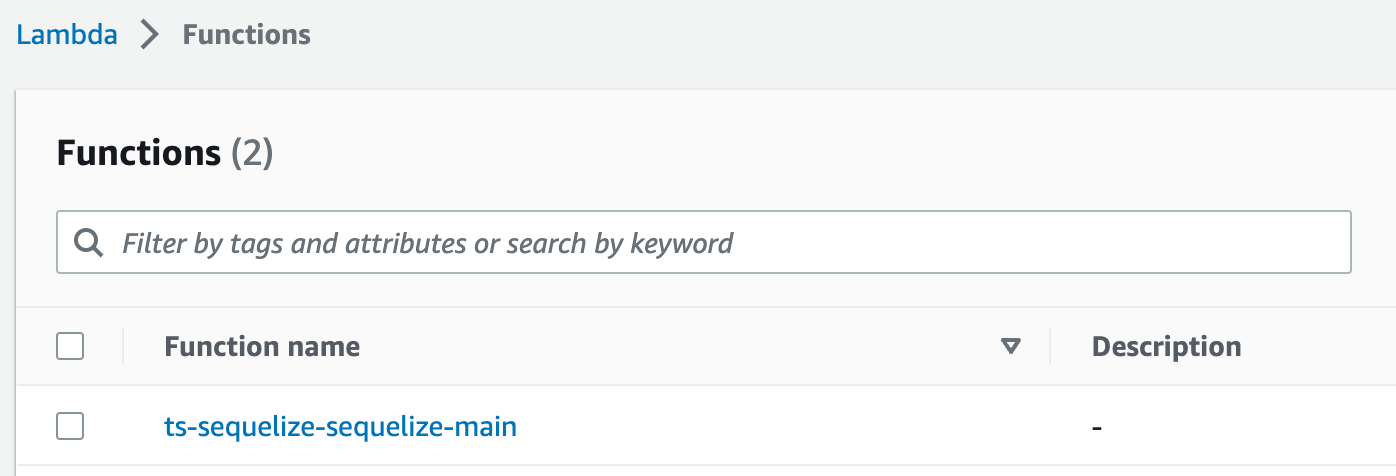
AWS
I won't go through all the AWS resources...but here is my Lambda function that was created.
Add a user
Now I have some piece of mind on resources created. Let's test.
Add your apiURL which includes your region and issue a POST request. Remember our database is just storing a simple key and value.
curl -X POST https://<...>.execute-api.<YOUR_REGION>.amazonaws.com/stage/item -d '{"key": "test_key", "value": "test_value"}' -H "Content-Type: application/json"You should see a success message.
Get a user
Get a 'user' or just test_key in our case. The result should be test_value
curl https://<...>.execute-api.<YOUR_REGION>.amazonaws.com/stage/item/test_keyResults

Check CockroachDB
Because I'm still not convinced...let's see what data is in CockroachDB. Login to CockroachDB using the username/password combo you set back in your Pulumi config.
I'll run a show tables and select * to see what we have.
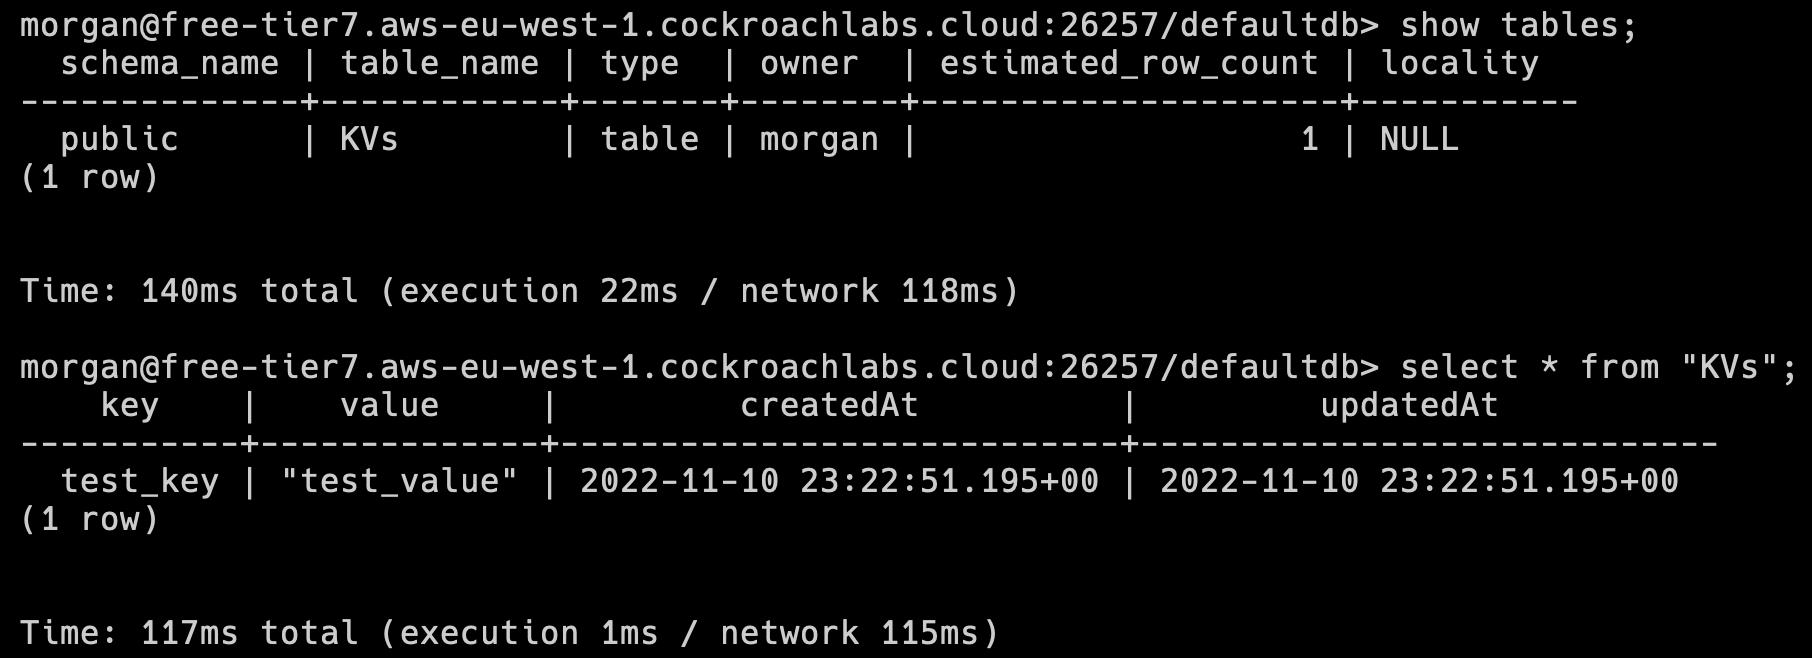
Our key and value are there!
Cleanup
Once done, just run a pulumi destroy to tear down the cloud resources.
pulumi destroy -s ts-sequelizeNote: As of writing, there is an issue destroying the CockroachDB Cluster as part of pulumi destroy.
Conclusion & Next Steps
This ended up being a great exercise to bring a local application to the cloud, especially as someone who doesn't always love manually setting up resources. I kept being surprised to see how many resources are created from just a few Klotho annotations.
There's a number of things I look forward to trying out in the future.
- Trying out integrations with other languages. Currently in Beta, Klotho works best with Typescript
- More advanced Klotho concepts - Convert infrastructure after already deploying, or run multiple deployments
- Run a larger scale application and database