Kysely and CockroachDB
By Morgan Winslow at
Testing out Kysely, a "type-safe and autocompletion-friendly typescript SQL query builder", on CockroachDB
Overview
Today I'll be playing around with Kysely (“Key-Seh-Lee”), a type-safe query builder written in Typescript. Kysely leverages the power of Typescript to ensure that valid SQL is being formed. You can see this functionality in real time as only valid table, columns, etc will show up as you build your queries. It was inspired by knex, which I'm admittedly also not familiar with.
Kysely currently works on PostgreSQL, MySQL and SQLite. Since CockroachDB is Postgres wire compatible, I can test out compatibility as I learn about this query builder. The reader should leave with a basic understanding of Kysely.
Shoutout to my good friend Artem for the Kysely find!
High Level Steps
- Install Kysely for PostgreSQL
- Create Users and Orders tables in CockroachDB
- Create UsersTable and OrdersTable interfaces in Typescript
- Leverage Kysely to build a variety of SQL statements
Code
In this blog I'll just be showing snippets of code. My full test application can be found here.
Setup
Pre-reqs
- CockroachDB connection string. Get started with Serverless for free here
- Typescript & Node.js installed
Install Kysely and Create tsconfig.json
Installing Kysely is pretty straightforward. In a new project run the following, which installs the Postgres version:
npm install kysely pgMore installation info can be found here.
I used the following tsconfig.json
{
    "compilerOptions": {
      "module": "ES2022",
      "target": "ES2022",
      "moduleResolution": "node",
      "noImplicitAny": true,
      "removeComments": true,
      "preserveConstEnums": true,
      "skipLibCheck": true,
      "sourceMap": true,
      "esModuleInterop": true,
      "allowSyntheticDefaultImports": true,
    }
  }
Create Users and Orders Tables
I'll create two simple tables for our testing. I wanted to create at least two, since Kysely can track typings and available columns even through JOINS. I also wanted a mix of NULL and NOT NULL columns.
Users Table
CREATE TABLE users (
 id UUID PRIMARY KEY DEFAULT gen_random_uuid(),
 name STRING NOT NULL,
 address STRING NULL,
 city STRING NULL,
 prefix STRING NULL,
);
Orders Table
CREATE TABLE orders (
  id UUID PRIMARY KEY DEFAULT gen_random_uuid(),
  user_id UUID NOT NULL,
  product_name STRING NOT NULL,
  quantity INTEGER NOT NULL,
  FOREIGN KEY (user_id) REFERENCES users (id)
);
Kysely Specifics
In this section I'll be stepping through the Kysely specific steps I took. I'll be working from a file called demo.ts.
Define Interfaces
Each table will be defined in an interface. Kysely will leverage these interfaces for the typings, so it's a crucial building block.
interface UsersTable {
  id: Generated<string>
  city: string
  name: string
  address: string
  prefix: 'Mr' | 'Mrs' | 'Ms' | 'Dr' | null
}
Most of this look pretty straightforward if you're even loosely familiar with Typescript. All columns that are generated by the database should be marked with the Generated type so that they are automatically made optional in inserts and updates.
The next 3 fields are just strings and can not be null. Kysely will require these values in an insert.
Lastly we have the prefix column. This one we've specified variations of what we want to allow in the column, and also say it can be null. (Note: I didn't specify this column as an ENUM type in the database but that would probably be better practice than only specifying it here)
Let's do the same for the Orders table and a Database interface.
interface OrdersTable {
  id: Generated<string>
  user_id: string
  product_name: string
  quantity: number
}

// Keys of this interface are table names.
interface Database {
  users: UsersTable
  orders: OrdersTable
}
Bonus
One other cool thing you can do is define different types for different operations. I'm not leveraging this in my code, but it's a powerful feature. An example could look like this:
interface Example {
    // You can specify a different type for each operation (select, insert and
    // update) using the `ColumnType<SelectType, InsertType, UpdateType>`
    // wrapper. Here we define a column `modified_at` that is selected as
    // a `Date`, can optionally be provided as a `string` in inserts and
    // can never be updated:
    modified_at: ColumnType<Date, string | undefined, never>
}
Define an Instance of Kysely
"You should create one instance of Kysely per database using the Kysely constructor. Each Kysely instance maintains it's own connection pool." - docs
Here we will use the PostgresDialect, which leverages the pg library. This allows us to just define our connection string to CockroachDB.
const db = new Kysely<Database>({
  dialect: new PostgresDialect({
    pool: new Pool({
      connectionString: 'postgresql://username:password@your-cockroach-cluster.cockroachlabs.cloud:26257/demo?sslmode=verify-full'
    })
  })
})
Create SQL!
Alright now to the more fun stuff. We'll take a look at INSERT and a couple SELECT statements to test Kysely features.
INSERT
A basic insert statement to our orders table will look like the following. In the screenshot below, values accepts an object whose keys are column names, and values are values to insert. You can see that Kysely has listed the options available to us, also indicating values not required. Each parameter required is suggested by Kysely.

Instead of creating this object manually, we can also just pass in an object. Below I've created a User type and passed that into the values.
const name = 'Morgan'
const address = '1234 cockroach way'
const city = 'New York City'

const user:User = {
  name: name,
  address: address,
  city: city,
  prefix: null
}

const { id } = await db.insertInto('users').values(user).returning('id').executeTakeFirstOrThrow()
You'll also notice I'm just returning the id generated upon insert, but more options are available there as well. I'll now use this id and other fake data to create an orders object.
const { id } = await db.insertInto('orders').values(order).returning('id').executeTakeFirstOrThrow()More can be read about the InsertQueryBuilder, and the different options available, here.
SELECT
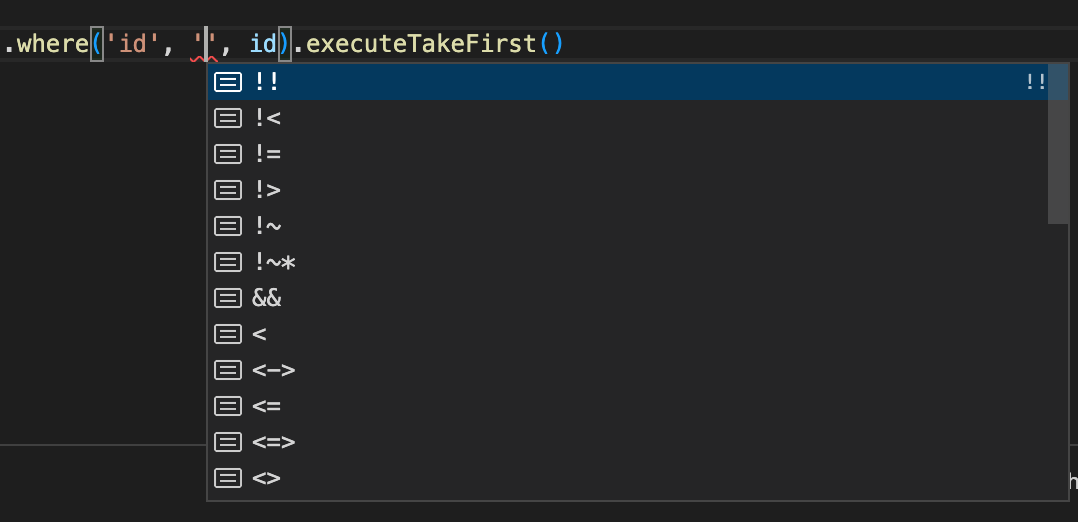
First I'll do a simple select just to grab my new user from the users table and test that everything works as expected. I'll assume I'm given an ID.
const user = await db.selectFrom('users').select(['name', 'address', 'city']).where('id', '=', id).executeTakeFirst()In the select portion, we have an array of columns that we want to select from the users table. The where clause accepts three parameters, each of which is type safe and will have suggestions pop up from Kysely. I thought it was cool that even the comparison operator had suggestions and was type safe.
The return result will be type safe for all the columns that we specified in the select. That means we can do something like the following to access this information.
console.log("My address is: " + user.address + ', ' + user.city)If we had not specified city in the select, it would not be a valid option in the example above.
You can read more about the SelectQueryBuilder here.
JOIN
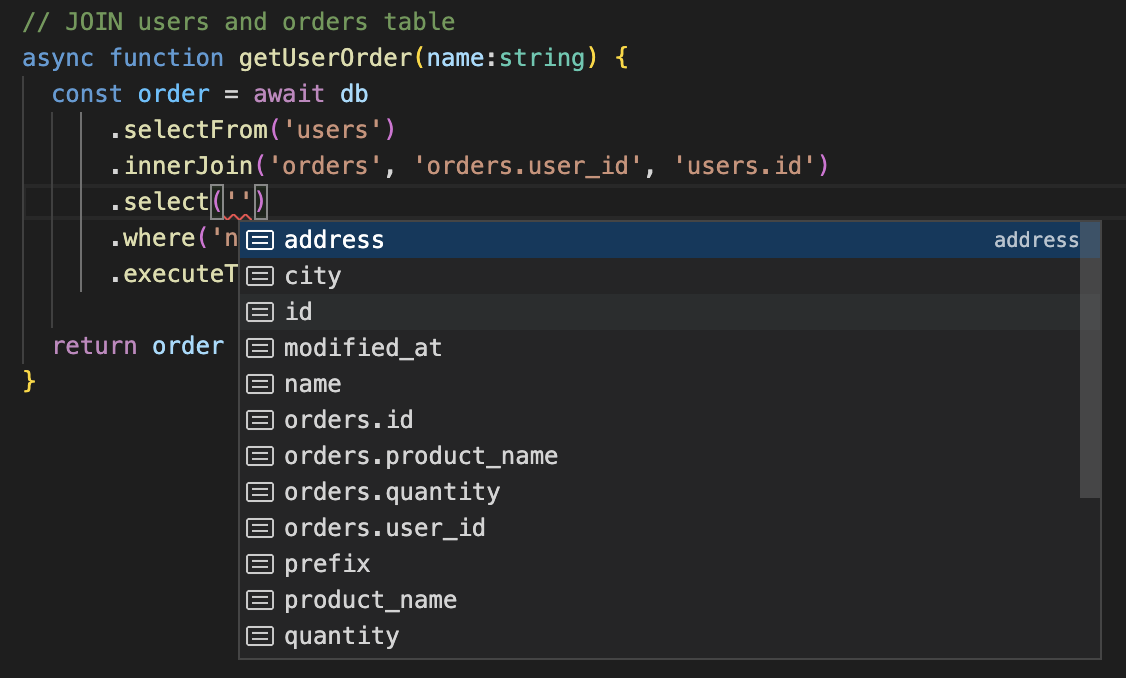
We can build on some of these concepts with the JOIN clause. Kysely will maintain typings even when handling multiple tables and operations get more complex.
In this example I will get all orders for a user with a given name.
async function getUserOrder(name:string) {
  const order = await db
      .selectFrom('users')
      .innerJoin('orders', 'orders.user_id', 'users.id')
      .select(['name', 'product_name', 'quantity'])
      .where('name', '=', name)
      .executeTakeFirstOrThrow()

  return order
}
The innerJoin clause accepts a table and then the two fields to join on. After this is specified, columns from both tables become available to you in the select. Here I am getting the name column from the users table, and the product_name and quantity columns from the orders table.
I also could have done the following to make a more clear distinction.
.select(['users.name', 'orders.product_name', 'orders.quantity'])The three items in the select are what will be available to us in the order constant.
Conclusion and Next Steps
There's a lot more where I could dive in deeper here, but for now I'll restrain since this has already gotten quite long. Overall this was a really fun project to play with. If you're a heavy typescript user, you'll appreciate the very seamless integration and how type safe things are every step of the way.
There's a number of next steps that I'd be interested in with this project.
- Test the kysely-codegen project, which generates Kysely type definitions from your database.
- Test the migrations capabilities for updating schema versions.
- Use in Deno
- Attempt more complex queries