Configure Single Sign On for CockroachDB CLI with GCP
By Morgan Winslow at
Logging into the CockroachDB CLI using a token obtained from a GCP IAM Service Account.

Overview
In today's blog we will be authenticating to the CockroachDB CLI using a short lived token, rather than a password. We will be retrieving an OpenID Connect (OIDC) token via the Google Cloud REST API with a Service Account. Once we have these basics down, in the next blog we can use these concepts to programmatically connect an application to CockroachDB and refresh tokens freely.
For further reading on this topic, check out the blogs below, where we authenticated to CockroachDB using Okta as our Identity Provider (IDP).
- Cockroach Cloud SQL Connection via SSO with Okta IdP - Go
- Using Refreshed IdP Tokens (Before Expiry) to Connect to CockroachDB via Connection Pools - Go
We will be referencing this guide from Google Cloud frequently:
Create short-lived credentials for a service account
High Level Steps
- Enable the IAM and Service Account Credentials API
- Create service account(s)
- Set cluster settings in CockroachDB to enable this mode of authentication
- Use GCP REST API to retrieve token
- Insert token into CockroachDB connection string and connect to the database
Pre-reqs
There are just a couple items to have in place before getting started. First, you'll need a CockroachDB Dedicated Cluster. Make sure to add a SQL user to your database and save the password somewhere safe.
Next you'll need a Google Cloud Platform account, with a project already created.
Google Cloud Steps
First let's go through all steps necessary in GCP.
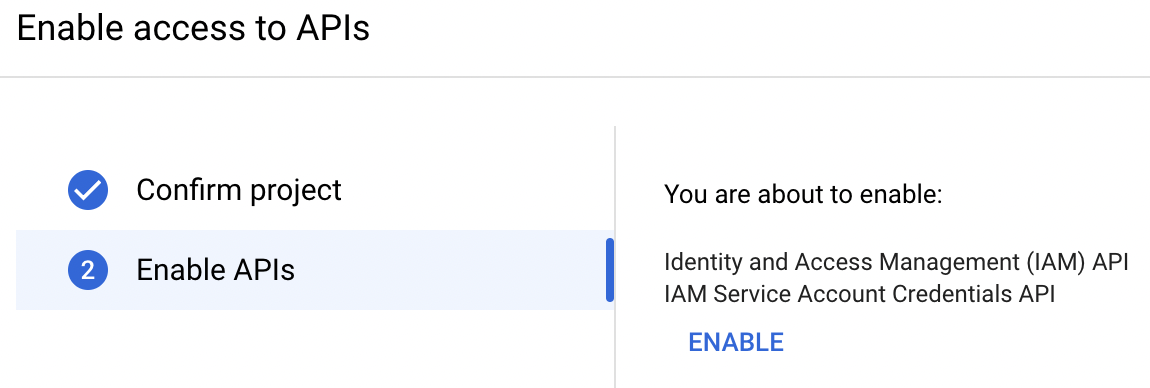
Enable the IAM and Service Account Credentials
If you're following along in the Google Cloud guide, you can look at (this step)[https://cloud.google.com/iam/docs/create-short-lived-credentials-direct#before_you_begin]. You'll confirm the project you are making changes to, and then just click 'Enable'. Pretty straight forward here, you should see something like the following.
Create Service Accounts
As pointed out in the guide, there's a couple ways to go about issuing a direct request. You can use your user account (gcp credentials) or you can use a service account. Both are pretty straight forward, and both utilize a "privilege-bearing service account" (PRIV_SA).
For this tutorial, I'll be utilizing the service account approach. The guide assumes these are already created, so I'll cover that quickly here.
First, navigate to the Service Accounts page in GCP.
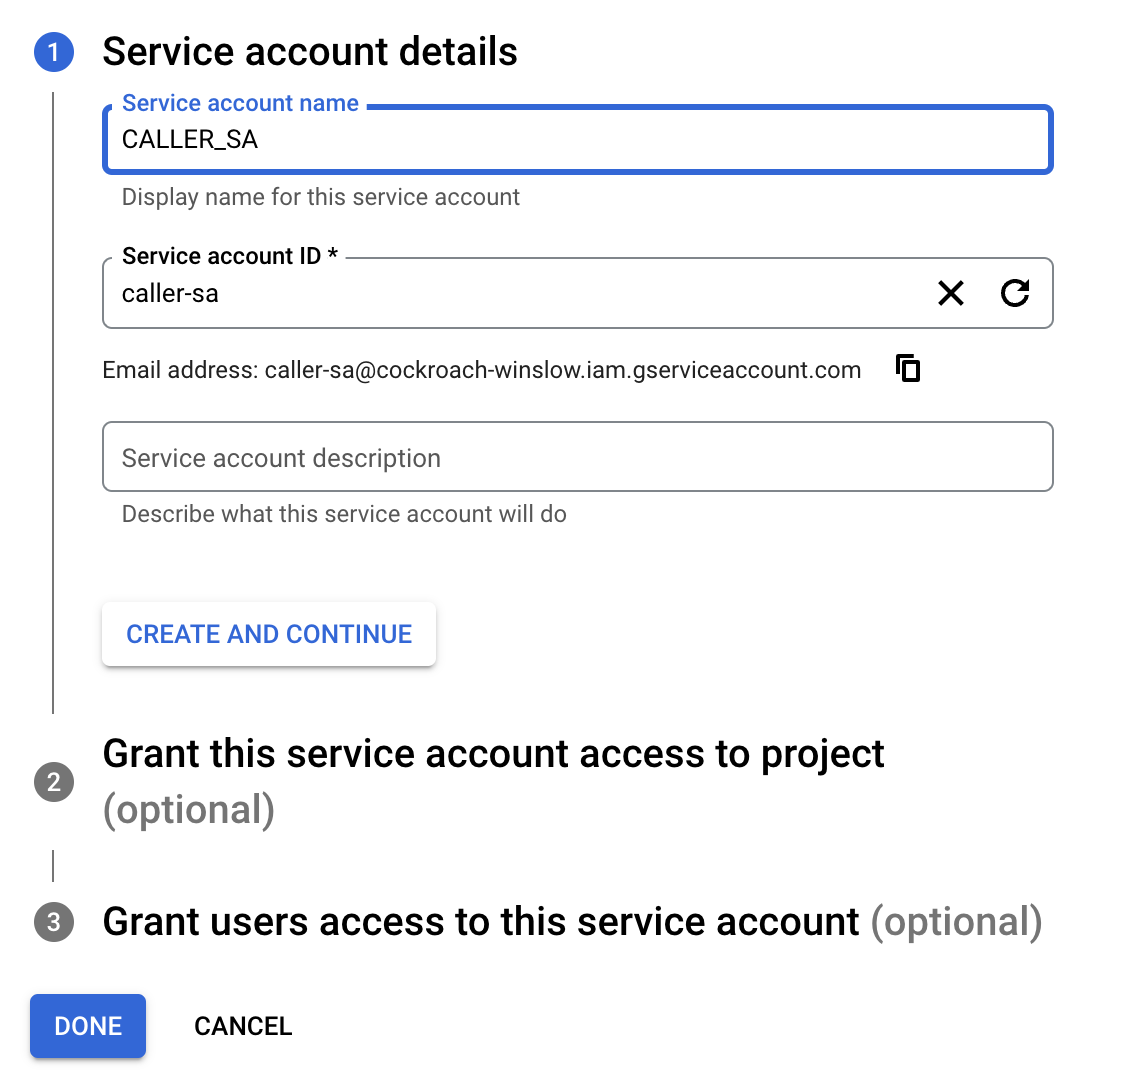
Create CALLER_SA
The caller account will be used to generate short-lived credentials for the privilege-bearing account.
Click 'Create Service Account.
Name your service account. I named mine CALLER_SA since that's how the guide refers to it.
Grant service account access to project -> Owner.
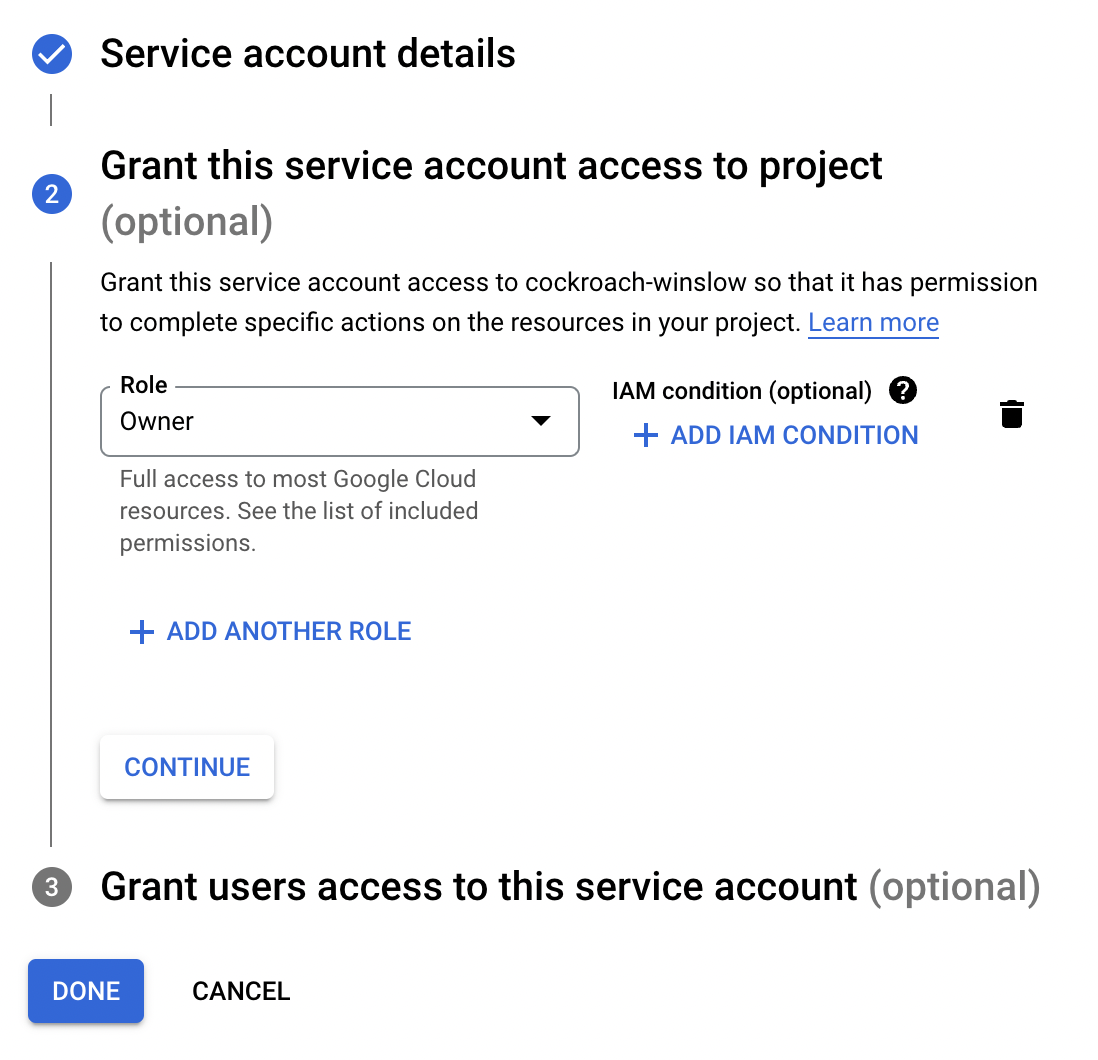
Grant users access to service account. I used my user credentials for both fields.
Click 'Done'.
Create PRIV_SA
Per the guide:
"This service account is granted the IAM roles needed for the short-lived token. This is the service account for which the short-lived token is created.".
Follow steps 1-3 just as before, but with the name PRIV_SA or any name of your choosing. You do not need to do step 4 here. Click 'Done'.
Provide Required Permissions
Next, I followed the steps in the guide to provide required permissions to my user account.
In addition to this, I also needed to follow the steps for adding permissions to a service account.
Test the Request
Now that we have our accounts in place, and permissions set, we can try requesting a token. The steps for this process are laid out in more detail in guide here.
Since this is simply an API request, there are any number of ways to test. I'll walk through the two methods I used.
Curl
Below is the curl command I used to request a token.
curl -X POST \
    -H "Authorization: Bearer $(gcloud auth print-access-token)" \
    -H "Content-Type: application/json; charset=utf-8" \
    -d '{"audience":"AUDIENCE_NAME","includeEmail":true}'\
    "https://iamcredentials.googleapis.com/v1/projects/-/serviceAccounts/PRIV_SA:generateIdToken"
There's a couple items to point out here, as well as some areas I deviated from the request shown in the guide.
1. Authentication
The $(gcloud auth print-access-token) command assumes you have already logged into the gcloud cli with your user account.
2. JSON
The guide shows how to set the request body by grabbing from a file called request.json. It's a minimal amount of data, so I'm just adding the JSON directly.
3. Variables
There's two variables you need to include in the request.
AUDIENCE_NAME: "The audience for the token, usually the URL of the application or service that the token will be used to access."
PRIV_SA: "The email address of the privilege-bearing service account for which the short-lived token is created."
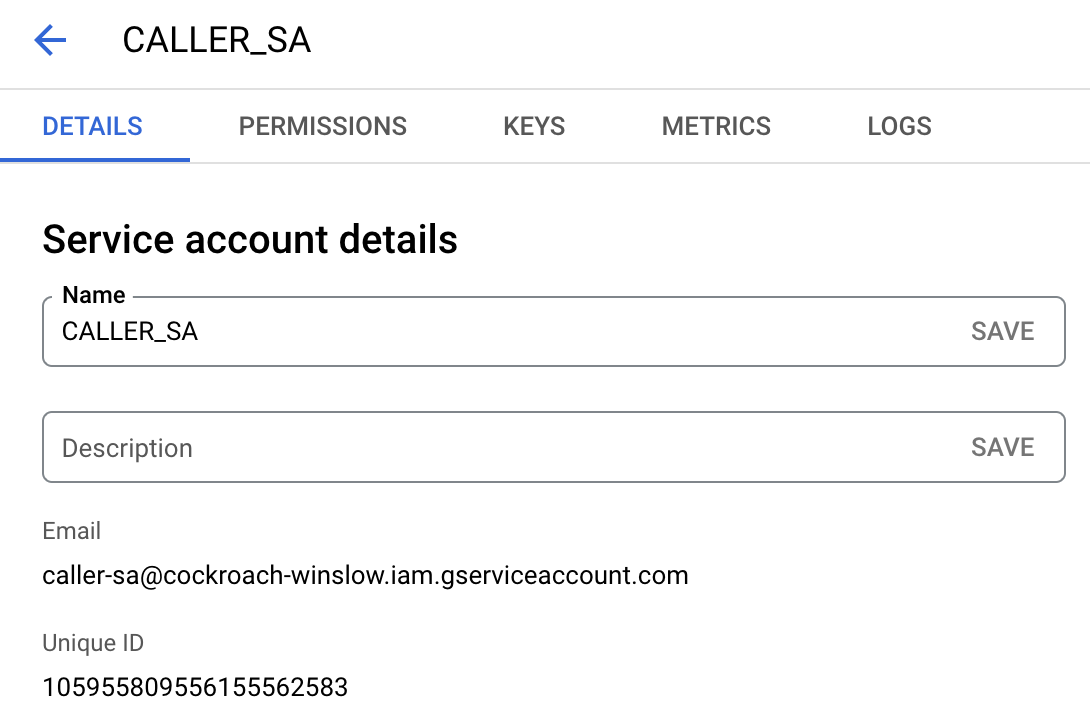
For AUDIENCE_NAME, you can use your CALLER_SA UniqueID OR Email. You'll find these on the CALLER_SA Service Account Details page. You could also use your gcp user email instead of the service account email/id.
For PRIV_SA, you can use your PRIV_SA UniqueID OR Email.
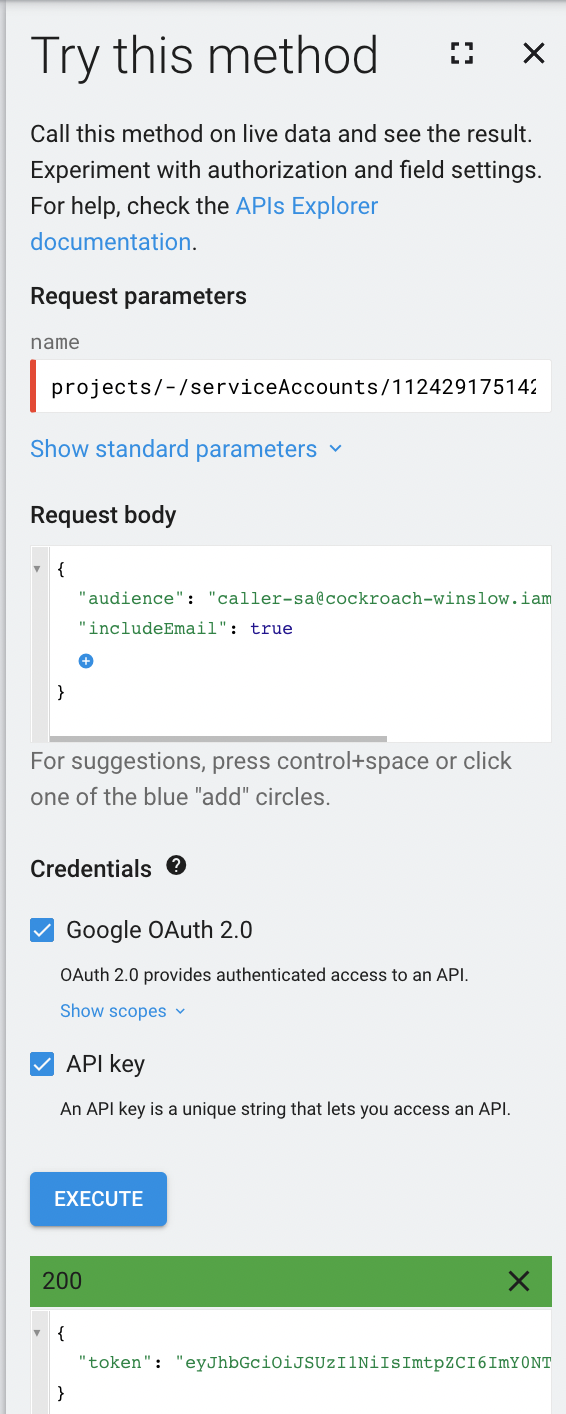
API Explorer (Browser)
Another quick way to test your setup is to use Google Cloud's API Explorer. This might be a more user friendly way to test.
CockroachDB Setup
Connect to CockroachDB via the CLI, using your sql user/password combo. Once connected, there's five cluster settings we need in CockroachDB that we need to set in order to get the configuration working. There first two settings you can copy exactly, but for the rest I'll show where to get the info in Google Cloud.
SET CLUSTER SETTING server.jwt_authentication.enabled=on;
SET CLUSTER SETTING server.jwt_authentication.issuers='https://accounts.google.com';
SET CLUSTER SETTING server.jwt_authentication.audience='';
SET CLUSTER SETTING server.jwt_authentication.jwks='';
SET CLUSTER SETTING server.identity_map.configuration='';
jwt_authentication.audience
This will be the same as the AUDIENCE_NAME you use to get your to your token. I used caller-sa@cockroach-winslow.iam.gserviceaccount.com which is my CALLER_SA Email.
jwt_authentication.jwks
From your browser, navigate to https://www.googleapis.com/oauth2/v3/certs. Copy this whole response string and set it as your jwks.
identity_map.configuration
This will be a combo of your issuer, PRIV_SA UniqueID, and your sql user. It will end up looking something like this.
SET CLUSTER SETTING server.identity_map.configuration='https://accounts.google.com 112429175142930094656 morgan';Connect to CockroachDB with Token
We should now have all CockroachDB settings in place, as well as the ability to generate tokens via REST requests. Let's try connecting to the database with the token rather than our password as we did before.
Insert your token where your password used to be. The only other difference is the need to add &options=--crdb:jwt_auth_enabled=true to the end of the connection string.
cockroach sql --url "postgresql://SQL_USER:YOUR_TOKEN_HERE@HOSTNAME:26257/defaultdb?sslmode=verify-full&sslrootcert=YOUR_CERT.crt&options=--crdb:jwt_auth_enabled=true"At this point you should be fully connected using the token!
Conclusion and Next Steps
Overall I found the Google Cloud setup pretty straightforward and could be a powerful tool to use if integrated with an application.
Next Steps:
- Integrate this approach with a basic app that handles the token and connection to the database. The token expires every hour, so our current method is not viable for much past testing.
- Improve service account setup. The current service account approach I took is pretty basic and I'm relying more on my user credentials.